1 Basics
1.1 Before starting
Before using, use the product safely after reading the user manual and safety precautions.
- The user manual describes based on the default setting values.
- The contents of the user manual may differ from the actual contents depending on the software version or model.
- Some services require an internet connection.
- If the user arbitrarily modifies the operating system or software, the product may not work properly. Also, warranty service is not covered for any problems caused by it.
- Data charges may apply when using features that use the Internet through mobile hotspots.
Description of the symbol
 |
Warning : This sign warns that a risk of death or serious injury may result if caution is not taken. |
 |
Ban : This sign infoms you of action that should not be taken when using the product. |
 |
Caution : This sign inform you of the precautions to be taken for safe and correct use of the product. |
 |
Note : This sign informs you of good information to know when using the product. |
1.2 Precautions for the use environment
The temperature of the product may become excessively high in the following situations. High temperatures may cause product performance degradation, malfunction, or compromise safety.
- Do not store the product in extremely low or high temperatures.
- Do not expose the product to direct sunlight for a long time.
- Do not keep the product in a poorly ventilated room for a long time in the middle of the hot summer.
- Do not keep the product near appliances that may overheat, such as stoves and heating appliances.
|
In case of unavoidable exposure to direct sunlight, it is very helpful to cover it with a dry towel. |
1.3 Safety precautions
This is to protect the safety of users and others and prevent property damage in advance. Please read the following carefully before use and be sure to follow it.
Warning
Failure to comply may result in death or serious injury.
Drive according to the actual laws.
Drive according to the marine indications and actual regulations when guiding a route using a GPS plotter.
The navigator should not keep an eye on the screen during the voyage.
It may cause a marine accident due to negligence in the front.
Do not mount the main in a place that interferes with vision or navigation.
Mounting it in a place that interferes with vision or safety may cause accidents at sea.
Install and wire correctly.
Failure to install and wire correctly according to the instruction manual may cause an accident or fire.
Do not disassemble, repair or remodel.
In case of failure, it may cause an accident or fire. If you disassemble, repair or remodel, you cannot receive A/S.
Do not use in a faulty or abnormal condition.
If it is used in an abnormal condition such as smoke or no sound, it may cause fire. Stop using it immediately and after checking the power supply , consult with the distributer you purchased .
This unit is for DC 12V to 36V only.
In case of using other volts , it may cause an accident or fire.
Use in a well-ventilated area.
If there is no ventilation, heat may be concentrated inside the main body and cause a fire.
Do not damage the wires and cords by pulling them.
It may cause a short circuit or disconnection, resulting in a fire or malfunction.
Do not drop it or subject it to strong impact.
It may cause malfunction or fire.
Precaution
Failure to comply may result in personal injury or property damage.
Do not use for a long time with the engine stopped.
Sometimes the engine does not run due to battery drain.
Use a standard product when replacing the fuse.
Use of non-standard fudge may cause fire or malfunction. Use a 5A fuse.
For correct use
Handle it correctly according to the instructions.
Do not leave it in extreme high or low temperatures. (Storage temperature range: -10℃ ~ +50℃)
About LCD screen
- The screen looks different depending on the viewing angle. Use it within the range of the following angles. (Top 20º, Bottom 20º, Left 45º, Right 45º)
- The vision may deteriorate at temperatures below -10°C or above +50°C, but this is not a malfunction. It will recover within the preservation temperature range.
- When used in cold weather (below 0°C), the internal lighting divice (backlight) dims, but recovers when the temperature rises.
- Hitting the screen with a sharp object may cause damage.
1.4 Name and role of each part
1.4.1 Components
 |
| Main device |
 |
| Protector |
 |
| Mounting Bracket |
 |
| Power Cable |
 |
| Wireless R/C |
| Fuse & Bolt |
| Knobs |
 |
| Transducer (600W or 1.5kW) |
- Components may not be compatible with other devices.
- The appearance and specifications of components are subject to change without notice.
- For separately sold product, use the genuine products provided by Haiyang Olix and distributer. The use of nongenuine products can cause performance degradation and failure, and if a problem occurs, you cannot receive warranty service.
1.4.2 Each part name and key description
| Move the depth up and down. | |
| Reduce or extend depth of water. | |
 |
Rotary: You can select a menu. You can set the ensitivity/attenuation when using the Fishfinder. |
| Button : This is [Input] key. | |
  |
MENU : Invoke the menu. |
| MODE : Select the mode, normal, bottom zoom, bottom lock, part zoom. | |
  |
PAGE : Use to select a Screen mode. |
| FUNC : It is used by setting the key the user wants. | |
  |
WPT : Add/delete marks. |
| CURSOR : Turn on the Time Machine. | |
  |
CANCEL : Use to cancel settings or exit menus. |
| POWER : Power On/Off or Open the System Control window. |
1.4.3 Connector specification
| 2-TD | |
 | |
| NO | NAME |
|---|---|
| 1 | SPD_PULSE |
| 2 | SPD_VC |
| 3 | TD1 |
| 4 | TD_GND |
| 5 | TD2 |
| 6 | TEMP_VCC |
| 7 | TEMP_SIG |
| 8 | SPD_GND |
| 3-TD | |
 | |
| NO | NAME |
|---|---|
| 1 | UDI_TD 2 |
| 2 | UDI_TD 1 |
| 3 | UFF_TD 2 |
| 4 | UFF_TD 1 |
| 5 | TEMP_VCC |
| 6 | TEMP_SIG |
| 7 | TD_GND |
| NMEA 2000 | |
 | |
| NO | NAME |
|---|---|
| 1 | SHIELD |
| 2 | DC ±12V |
| 3 | DC - |
| 4 | CAN_H |
| 5 | CAN_L |
| POWER | |
 | |
| NO | NAME |
|---|---|
| 1 | DC +(12V~36V) |
| 2 | DC - |
| 3 | NC |
| NMEA 0183 | |
 | |
| NO | NAME |
|---|---|
| 1 | GND |
| 2 | TX + |
| 3 | GND |
| 4 | RX + |
| 5 | RX - |
| 6 | +12V |
| AIS | |
 | |
| NO | NAME |
|---|---|
| 1 | GND |
| 2 | TX + |
| 3 | GND |
| 4 | RX + |
| 5 | RX - |
| 6 | +12V |
1.5 Memory card
Memory cards are used to store, restore, and back up various user data such as mark, route, track, set value and etc.
Vega support SD and micro SD.
|
|
1.5.1 Inserting memory card
Open the cover of the memory card slot and insert the memory card according to the hole. In the case of SD or microSD, insert it until it clicks.
|
|
1.5.2 Removing the memory card
For SD and microSD, first press once until you hear a click sound. It pops out slightly for easy removal. After, take it out lightly.
|
Do not separate the memory card immediately after using the product, transferring the file, or completing the transfer. Data may be damaged or lost, or the product may malfunction. The user is responsible for any damage such as data loss caused by incorrect use. |
1.6 Turn on/off
1.6.1 Turn on
Press ![]() lightly to turn on the product.
lightly to turn on the product.
1.6.2 Turn off
- Press
 .
. - Press
 .
. - Press
 or 'Yes' when a guide message appears.
|
You can also turn it off by pressing and holding |
1.7 Import previous device settings
You can import settings from your old device to your new device.
- Insert the memory card into the old device.
 → 8. Advanced → 5. Others → 1. Save User Setting to the memory card through Save User Settings.
- Remove the memory card from your old device and insert it into your device.
- From new product go to → 8. Advanced → 3. Maintenance → 7. Initialization → 1. User Initialization to Import old device's settings from memory card.
1.8 Touch screen operation
1.9 System Controls
You can make basic system settings. You can enter by pressing ![]() .
.

| Power off. | |
| Restart the power. | |
| It can be adjusted by pressing | |
| Switch to night mode. | |
| Disable the touch screen. Long touch when locking by touch. | |
| Enter the Wi-Fi setting window. Connect to the Internet through Wi-Fi before using the online update. | |
| Enter the Bluetooth setting window, Connect to the smart phone with Bluetooth before using the Pegasus. | |
| Connect with VEGA-F using HY-NET. |
1.9.1 HY-NET
VG-12F, VG-10F connect with Bluetooth supported GPS plotter. Then they work together like one machine.
Pairing with VEGA-F and GPS plotter
HY-NET uses bluetooth. Pairing the two machine when connecting for the first time.
Connect using HY-NET
1.10 Other setting
1.10.1 Unit setting
Set the units for distance and speed in ![]() → 8. Advanced -> 2. Setup -> 1. Unit.
→ 8. Advanced -> 2. Setup -> 1. Unit.
- DIST/Speed
1NM = 1.852km
1kt=1.852km/h - Depth
1m = 3.281ft = 0.549fm = 0.609lfm = 0.660Jfm - TEMP
Celsius℃ = Fahrenheit +32℉
1.10.2 Time&Date Setting
![]() → 8. Advanced → 2. Setup → 3. Time&Date
→ 8. Advanced → 2. Setup → 3. Time&Date
- Reference
The GPS receiver uses the international standard time, the time zone may vary by region (country).The display time can be adjusted when sailing in different time zone - Time Format
You can set the time display method. - Date Format
You can set the date display order to year-month-day, month-day-year, day-month-year. - Month Format
You can set the date format to either letters or numbers.
1.10.3 Input-output setting
![]() → 8. Advanced → 2. Setup → 4. Input/Output
→ 8. Advanced → 2. Setup → 4. Input/Output
- Output Sentences
| DESCRIPTIONS | CONTENTS OF DATA FIELD | DEFAULT |
|---|---|---|
| $GPGGA | GPS information | ON |
| $GPVTG | Ship speed and direction inforamtion | ON |
| $GPZDA | Time and Date | OFF |
| $GPRMB | Recommended minimum voyage information | OFF |
| $GPRMC | GNSS information | ON |
| $GPAPB | Heading/track controller (autopliot) sentence B | ON |
| $GPXTE | Cross-track error, measured | OFF |
| $GPBOD | Bearing, origin to destination | OFF |
| $GPBWC | Waypoint direction and distance | ON |
| $SYPLT | 삼영 자동 조정 장치 | OFF |
- Transmit
You can set the NMEA and AIS transmission speed. - Output Version
You can set the Output Version.
1.10.4 Transparency
In ![]() → 8. Advanced → 2. Setup → 6. Customizing → 6. Alpha Blending, you can set the background transparency of the data bar and sub screen. (The lower the number, the more transparent it is.)
→ 8. Advanced → 2. Setup → 6. Customizing → 6. Alpha Blending, you can set the background transparency of the data bar and sub screen. (The lower the number, the more transparent it is.)
1.10.5 Auto back up
When ![]() → 8. Advanced → 2. Setup → 6. Customizing → 9. User Convenience → 1. Auto Backup is turn on, WPTs and tracks are automatically backed up internally. File name is saved as mark WPT_backup.dat and track TRACK_backup.dat.
→ 8. Advanced → 2. Setup → 6. Customizing → 9. User Convenience → 1. Auto Backup is turn on, WPTs and tracks are automatically backed up internally. File name is saved as mark WPT_backup.dat and track TRACK_backup.dat.
1.10.6 Equipment initialization
You can initialize in ![]() → 8. Advanced → 3. Maintenance → 7. Initialization.
→ 8. Advanced → 3. Maintenance → 7. Initialization.
- User Initialization : It is initialized to the settings saved by the user.
- Setup Initialization : All set values are initialized to the initial state.
- Factory initialization : All set values and user datars are initialized to the initial state.
|
You can save user setting file for user initialization through |
1.10.7 Buzzer setting
You can turn on and off the action sound in ![]() → 8. Advanced → 2. Setup → 5. Buzzer.
→ 8. Advanced → 2. Setup → 5. Buzzer.
1.10.8 Check the version
You can check the version in ![]() → 8. Advanced → 3. Maintenance.
→ 8. Advanced → 3. Maintenance.
- Program Version
- OS Version
- Map Version
1.10.9 Simulator
In ![]() → 8. Advanced → 3. Maintenance → 4. Simulator, you can test the fishfinder with the data stored in the memory.
→ 8. Advanced → 3. Maintenance → 4. Simulator, you can test the fishfinder with the data stored in the memory.
1.10.10 Remote control settings
You can settings related to the remote control in ![]() → 8. Advanced -> 3. Maintenance -> 6. Remote Control Settings.
→ 8. Advanced -> 3. Maintenance -> 6. Remote Control Settings.
- Remote Control : You can set whether to use the remote control.
- Remote Control Pairing : You can register the remote control to use with this product. When the remote control registration window appears and then press the Cancel button on the remote control twice, Remote control is registered. When a remote control is registered, operation is possible only with the remote control.
- Remote Control Dispairing : Unregister the remote control and receive operation signal from all remote control.
1.10.11 Wired LAN setting
You can set IP of wired LAN in ![]() → 8. Advanced → 3. Maintenance → 8. Wire LAN.
→ 8. Advanced → 3. Maintenance → 8. Wire LAN.
1.10.12 Online update
Programs and maps can be updated to the latest version through the Internet.
|
Hotspot is function that supplys wireless internet through smartphone, you can skip this process where Wi-Fi wireless internet is available. |
1.10.13 Language and Input
You can set Android system languages and keyboards on ![]() → 8. Advanced → 3. Maintenance → 10. Advanced Menu → 1. Language & Input.
→ 8. Advanced → 3. Maintenance → 10. Advanced Menu → 1. Language & Input.
2 Fishfinder
2.1 Screen description
2.1.1 Pages
Press ![]() allows you to select 16 different screen modes.
allows you to select 16 different screen modes.
|
You can not use pages include 340kHz without 3 Frequency transducer. |
2.1.2 Modes
You can use the various zoom mode by pressing ![]() in the normal mode.
in the normal mode.
|
The above feature is only available in normal mode. |
|
You can set zoom ranges used in bottom lock, bottom zoom from |
2.2 Data bar

2.2.1 Adjusting the depth of water.
Press ![]()
![]() to adjust the depth of the water. or
to adjust the depth of the water. or
- Press

 to select the depth of water.
 - Turn to adjust the depth of water.
2.2.2 Auto/Manual depth range
You can change the depth of the water automatically or manually from ![]() → 2. Depth Range.
→ 2. Depth Range.
2.2.3 Depth of water shift
Raise the lowest depth of water as you want and display it on the screen.
You can set in ![]() → 4. Shift.
→ 4. Shift.
|
Depth of water shift is only available for manual depth of water. |
2.2.4 Adjusting the Sensitivitiy
- Press
 to select the sensitivity of frequency. You can see that the frequency has been selected through the blue text background.
 - Turn to adjust the sensitivity.

|
To change the sensitivity auto/manual, press |
2.2.5 Adjusting the attenuation (STC)
- Select attenunation (STC) of frequency by pressing .
- Adjust the attenuation (STC) by turning .
2.3 Time machine
If you turn off ![]() → 7. Scroll, you can look back when you want to see the past screen of fishfinder.
→ 7. Scroll, you can look back when you want to see the past screen of fishfinder.
- Press the [Cursor] key on the remote control with the fishfinder.
- When the cursor is called, press , turn , or move to the past fishfinder screen by using touch and check it.
|
If you press |
|
The length of the screen that can be checked on the time machine with depends on the depth of water. |
2.4 Screen Settings
2.4.1 Image speed
![]() → 6. Fishfinder → 3. Display → 2. Image Speed. You can select the movement speed of the fishfinder screen from 1/32X to 4X.
→ 6. Fishfinder → 3. Display → 2. Image Speed. You can select the movement speed of the fishfinder screen from 1/32X to 4X.
2.4.2 White line
Change the color of seabed surface in ![]() → 9. Advanced → 6. Display → 3. White Line, It clearly distinguishes the school of fish and the seabed. You can change to black and white.
→ 9. Advanced → 6. Display → 3. White Line, It clearly distinguishes the school of fish and the seabed. You can change to black and white.


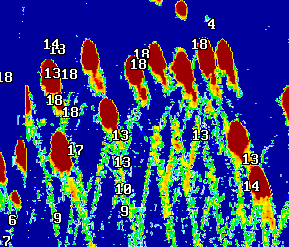
2.4.3 Fish symbol
You can set display fish symbol on school of fish when the school of fish detected on fishfinder screen in ![]() → 9. Advanced → 6. Display → 9. Fish.
→ 9. Advanced → 6. Display → 9. Fish.
- Fish symbol : Turn on and off the Fish symbol.
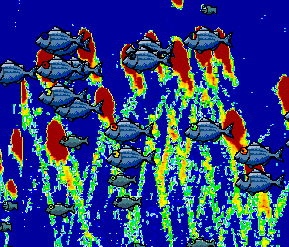
- Fish size : Turn on and off mark of the size of fish groups. It can be marked in cm or inch.


|
|
2.5 Other settings
2.5.1 Rejection
Eliminate interference caused by fishfinder of other ship.
It is used at close range to fish with other ships equipped with sonar.
You can turn on and off in ![]() → 6. Rejection → 1. Interference Rejection.
→ 6. Rejection → 1. Interference Rejection.
2.5.2 Color Rejection
Erazes from the screen one at a time from the lower level colors.
Use this when a lot of noise is displayed on the fishfinder screen or when you want to see only a strong reflector.
You can set it in ![]() → 9. Advanced → 7. Color → 1. Color Rejection..
→ 9. Advanced → 7. Color → 1. Color Rejection..
2.5.3 Finder Screen Color
You can change the background color of the fishfinder screen in ![]() → 9. Advanced → 7. Color → 2. Finder Screen Color.
→ 9. Advanced → 7. Color → 2. Finder Screen Color.
2.5.4 Image Filter
You can turn on/off horizontal and vertical image filters in ![]() → 9. Advanced → 7. Color → 3. Image Filter.
→ 9. Advanced → 7. Color → 3. Image Filter.
2.5.5 Pulse
Change the transmission pulse width of the fishinder transmitter in ![]() → 9. Advenced → 10. Others → 1. Pulse.
→ 9. Advenced → 10. Others → 1. Pulse.
|
If the pulse width is narrowed, the school of fish discrimination is good and the water of depth discrimination is poor. |
2.5.6 Water temperature
When the water temperature is not correct, You can calibrate in ![]() → 9. Advanced -> 10. Others → 2. Watere TEMP.
→ 9. Advanced -> 10. Others → 2. Watere TEMP.
2.5.7 Boat speed
When the Ship speed is not correct, You can calibrate it in ![]() → 9. Advanced -> 10. Others -> 3. Boat Speed.
→ 9. Advanced -> 10. Others -> 3. Boat Speed.
|
Available only when the ship speed input setting is Transducer. |
2.5.8 Draft set
When the ship's transducer position is different from the water's surface, You can calibrate it in ![]() → 9. Advanced → 10. Others → 4. Draft Set.
→ 9. Advanced → 10. Others → 4. Draft Set.
2.5.9 Speed source
Select which ship speed information to receive in ![]() → 9. Advanced → 10. Others → 5. Speed Source.
→ 9. Advanced → 10. Others → 5. Speed Source.